Sunday, February 27, 2011

Mutton chunks in black pepper sauce with butter garlic rice

I’m back with a heavy heart ‘cos I've to start all over again. My operating system crashed and I lost all my recipes and pictures attached. But I said “what the hell, let me make them all again!”:(

It’s a Sunday, and this morning my hubby walked up to me and said that he wants to gorge on mutton in a brown colour gravy with some rice. And this is what I stirred up.


Let me start with the mutton chunks in black pepper sauce,

Preparation time: 10minutes
Cooking time: 30minutes
Serves: 3-4

You need:
500gms of boneless mutton (cut into 1 inch chunks)
1tsp of black pepper powder (preferably fresh)
salt to taste

For the sauce:
1tsp black peppercorns
½ tsp black pepper powder
½ tsp garlic paste
½ tsp ginger paste
1tsp soya sauce
2 tbsp cornflour
1tsp vinegar
1tbsp olive oil (or sunflower oil)
 For garnishing:
5-6 stalks of fresh coriander (save the leaves to garnish the rice)

Step-by-step:
Cook the mutton chunks with a tsp of pepper powder and a tsp of salt for 4-5whistles (if you can marinate for at least half an hour before cooking, nothing like it!) 

While the mutton’s getting cooked, let’s make the sauce 

In a thick bottomed pan (preferably non-stick), add a tbsp of oil. Once it’s hot, reduce the heat, add the ginger, garlic pastes and the black peppercorns
(Yes…I love that smell too) 

Cook till the pastes change colour

Now add the black pepper powder, soya sauce, and vinegar. Stir on low flame for a minute
Strain the cooked mutton and keep aside 

Add 2tbsp of cornflour to the mutton stock and pour this mixture into the sauce. Allow the sauce to thicken. 

Taste the sauce for spice and salt (You don’t need to add salt since the soya sauce is already added) 

Throw in the mutton chunks and cook for another minute 

Garnish with finely cut fresh coriander stalks


You can have this dish with bread too, but I prefer rice for a Sunday lunch. Here’s how I made the butter garlic rice

Preparation time: 10 minutes
Cooking time: 15 minutes
Serves: 4-5

You need:
6-7 pods of garlic (crushed)
2tbsp of butter
1tbsp olive oil (sunflower oil)
2cups of long grained rice (I used basmati)
1 chicken stock cube (maggi) or 4 cups of chicken stock

For garnishing:
2tsp butter
3-4 pods of garlic (julienned)
coriander leaves

Step-by-step:
Wash and soak rice for 10minutes 

In a flat vessel, add the butter and oil. (Keep on low flame to avoid burning the butter)

Add the crushed garlic and fry till they turn brown 

Drain the rice and add to the buttered garlic. Fry for a minute 

Pour in the chicken stock, once it starts boiling, cover and cook for 10minutes or till the rice is done. (The ready made chicken stock cubes already have salt so check before you add more) 

In a small frying pan, add butter and garlic. Fry till the garlic turns brown. 

Pour on to the rice. Chop the coriander leaves and decorate your rice. 

Serve hot with mutton chunks in black pepper sauce

 Have a great Sunday!!

Yours Tastefully!!

Friday, February 18, 2011

Capsicum and grape salad – zero oil cooking

I've heard a salad every day is nourishing and healthy. Since salads are very filling, eating one prior to your main course will reduce the number of calories you end up consuming…(I know you’ve heard enough of that)….I’m also not a salad lover, but lately I’ve started including a salad with every meal. Mostly when I make French/Italian food( or when I begin to feel guilty). It’s interesting to make your own salad (like this one) by mixing coloured vegetables or fruits of your choice(they look lovely and are yummy too). We just need to develop the taste… So bring out your cutting boards, knives and bowls and start making this tri coloured salad!

Preparation time: 10minutes
Cooking time: nil
Serves: 2

You need:
½ green capsicum               
½ yellow capsicum
½ red capsicum
15 green seedless grapes
lemon- half
½ tsp sugar
salt to taste
½ tsp pepper powder
½ tsp chaat masala powder

Step-by-step:
  • Cut the capsicums (green, yellow and red) and grapes into small cubes
  • In a bowl, mix the cubed capsicums and grapes.
  • Add the salt, sugar, pepper powder and chaat masala
  • Squeeze the juice of half a lemon and give it a good mix

Variation: If you don’t like the taste of raw capsicum, fry them in a tsp of olive oil and follow the same process (but that’s no more zero oil cooking)

Serve within half an hour or chilled

Cheers to one more step towards being healthy..

Yours Tastefully!!

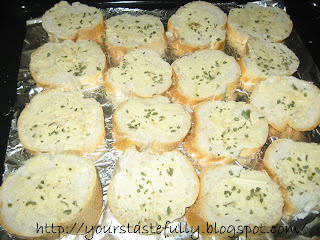
Home made garlic bread (never been so easy)


I have always loved garlic bread and I never miss ordering garlic bread sticks with a pizza. The best garlic bread is usually almost bathing in butter but if you are looking for an easy garlic bread recipe that’s healthy too, here it is…

Preparation time:  10 minutes
Cooking time: 5-6 minutes
Serves: 5-6

You need:
A loaf of French bread           
1 tbsp olive oil
5 tbsp butter
5-6 tsp of garlic paste
5-6 pinches of dried herbs (I use basil or oregano)
Salt to taste (if you are using unsalted butter, I used salted)

Step-by-step:
  • Preheat oven to 1700 C
  • Cut the bread into two halves and cut each loaf horizontally
  • Melt the butter (if you are melting the butter in the microwave, make sure you don’t let it boil 'cos it'll spoil the taste)
  • Mix the garlic paste and olive oil into the butter
  • Transfer the bread on to a chopping board and cut into thick slices (cut into stips if you like garlic bread sticks)

  • Spread the butter garlic on both sides of the bread
  • Spinkle salt this stage( if you are using unsalted butter or if you like it with extra salt)
  • Crush the dried herbs and sprinkle all over it (look at it....it I can’t wait anymore)
  • Take a baking dish, place a sheet to aluminum foil on it
  • Bake for 5-6 minutes (at the same temp), until it's lightly brown on top
  • Carefully remove from the oven and let it cool for about 2-3 minutes
That’s it! Your homemade garlic bread is ready!!

Variation: If you want a cheesy garlic bread, add some mozzarella cheese to the bread before you bake it
Yours tastefully!!
Sending this to Srivalli's Breakfast Mela.


and  "Dish Name starts with H" hosted by Akila's kitchen


and “food for little champs" hosted by Indu get cooking (Indu Mathew) 

Monday, February 14, 2011

Chocolate dipped strawberries -for my valentine

“I don't pretend to know what love is for everyone, but I can tell you what it is for me; love is knowing all about someone, and still wanting to be with them more than any other person, love is trusting them enough to tell them everything about yourself, including the things you might be ashamed of, love is feeling comfortable and safe with someone, but still getting weak knees when they walk into a room and smile at you.” – Anonymous

Today is Valentine’s Day. Another occasion to tell my hubby how special he is to me. For a surprise dinner, I’ve planned to make garlic bread, Spanish omlette, a salad and …chocolate dipped strawberries for dessert (the best part of a meal).

Take a look at how I made the dessert and the dinner recipes will soon be posted.

Preparation time: 10 minutes
Cooking time: 10 minutes
Serves: 2

You need:
12 fresh strawberries with leaves            
40gms of white chocolate
20gms of dairy milk chocolate (brown)

Step-by-step: 
  1. Wash the strawberries gently under cold water. Do not remove the leaves but make sure it’s washed thoroughly; dry them using a paper towel and set aside
  2. Break the white chocolate bars into a bowl and put them in the microwave for 30-40secs on high. If your chocolate is nice and smooth when you stir it, then go ahead and get ready to dip, if not put it back in the microwave for another 30secs and stir again
  3. Once the chocolate is ready for dipping, take a tray and place a piece of foil on it
  4. Take each strawberry, hold it on the top (be careful not to tear the leaves), dip it in the chocolate making a circular motion, take it out, twist it so the chocolate is well coated, now place it on the foil. Make sure you dip only 3/4th of the strawberry in the chocolate
  5. Keep it aside for 5mts (in room temp)
  6. Follow step 2 with the dairy milk chocolate bars (brown)  
  7. By the now, the white chocolate coating will take shape on the strawberry. Take the white chocolate coated strawberry and dip it in the chocolate sauce(brown) till it half coats the white chocolate (wow…don’t they look elegant!)
  8. Follow the same method for the rest of the strawberries and refrigerate. Let it set for 30mts to an hour.
Serve with lots of love…

I hope you enjoyed making the chocolate dipped strawberry for your sweetheart!!


Happy Valentine's Day!!

Yours tastefully!!

Thursday, February 10, 2011

Avarakya upperi / Indian broad beans stir fry


Yesterday, for lunch, I made a spicy and delicious stir fry which is simple, healthy and makes a yummy side with rice and sambhar. It’s a very malabari style of making avarakya upperi (also called amarakka/ amarakya in some parts of Kerala / widely known as Indian broad beans).

Preparation time: 10 mts                                                                          
Cooking time: 10 mts
Servings: 3-4      

                                 
You need:
1/4kg avarakya / Indian broad beans                                        
1 onion julienned (cut into long thin strips)                                                
1 tsp red chilly powder (add more if you like it spicy)
1/4 tsp turmeric powder
salt to taste
2 tbsp vegetable oil

For garnishing:
1 tbsp coconut oil (optional)

Step by step:
  • Wash the beans thoroughly, trim the edges, de-string, tear each one into two pieces (very important or you'll find slimy worms in your dish) and chop them into 1/2" pieces. Wash them again (in warm water with a pinch of salt).You can include the seeds too for the masala    
  • Transfer the chopped avarakya in to a glass bowl and microwave (high) for 10mts (like I do) or cook the chopped avarakya with about half a cup of water in a closed pan until soft. If it’s watery remove the lid and cook on high flame...ensure the avarakya is now completely dry
  • Heat oil in a kadhai, add 2 tbsps of cooking oil, now add the julienned onions and stir on medium flame for 4-5 mts /till the onions turn transparent
  • Add the spice powders and salt (remember to switch on the chimney/exhaust fan before the powders go in to the kadhai) fry for 2mts
  • Throw in the cooked beans and stir for about 5mts till the masala is well coated on them. Turn off the flame
  • Now drizzle a tbsp of coconut oil for that extra oomph  (hmmm.....love the smell of coconut oil)
It goes well with rotis too...
  
Enjoy….tell me if you liked it or even if you didn't!!

Yours Tastefully!!

Thursday, February 3, 2011

Gajar Ka Halwa – the first dessert I remember making on my own!


Delicious, sweet, colourful... this dessert needs no introduction. Writing this post got me a lot nostalgic and reminded me of the days when I started testing my culinary skills…..the guinea pigs were my lovely parents and my darling brother….I started trying recipes on my own when I was in school.…..my parents always encouraged me, loved anything that I tried and my brother used to clean the pot but was also my best critic…….

There you have it; my first dessert

Preparation time: 10 minutes                                          
Cooking time: 40 minutes
Servings: 7-8

Ingredients:                                                        
                                    
700gms /4 cups red carrot peeled and grated
½ litre milk
2 cups sugar (depends on your taste)
200gms khoya / mava
4 tbsp ghee


For a garnish:
1 tbsp ghee
15 Cashew nuts(broken in to halves)
15 Almonds (soaked in hot water, peeled and sliced)

Step-by-step:
  • Peel, wash and then grate carrots
  •  In a non-stick kadhai, add 4 tbsps of ghee, fry the cashew nuts and then the almonds. Once they are slightly brown, keep them aside (hmm…smelling good!!)
  • Add the grated carrots in the remaining ghee now and fry till the carrots start losing the raw smell (and how do you check???...hey…just keep smelling it)
  • Pour the milk, once it's boiling reduce the flame, cook for about 20 minutes or until the milk is completely absorbed
  • To this, add sugar and keep stirring on medium flame (Adding sugar will make the halwa watery. So continue cooking till it’s soft and dry)
  • Add khoya. Cook on medium flame (approximately 15 minutes), stirring constantly
  • Turn off the fire when the halwa is still moist
  • Transfer in to a serving dish
  • Pour a tbsp of ghee on the top
  • Garnish with sliced almonds and cashew nuts
Serve it hot with a dollop of vanilla ice cream or refrigerate and serve chilled...
                                  
My son loved it.......so I had a winner on hand today.
Go ahead...... give it a try!! And don't forget to write in your experience!!
Sending this recipe to “food for little champs" hosted by Indu get cooking (Indu Mathew)

Yours Tastefully!!

Tuesday, February 1, 2011

Dal Fry !!

As simple as it can get...
 

An easy and basic dish that’s probably a part of everyday dining. Made in a jiffy and hassle free, I always make sure that at least one cup of cooked toor dal is stocked in my fridge (Now that’s a free tip!)

Preparation time: 10 mins
Cooking time: 10 mins
Servings: 2-3

Ingredients:                                        

1 cup of toor dal
1 medium sized onion (chopped fine)
3 pods of garlic (crushed)
1 green chilli (slit lengthwise)
1 medium sized tomato (chopped fine)
1/2 tsp of turmeric powder
1/2 tsp chilli powder
2 tbsp of cooking oil
salt as per taste
Water (if required)


For tempering:
½ tsp of cumin seeds
½ tsp of fennel seeds
For garnishing:
2 tbsp of fresh coriander (chopped fine)

Step-by-step:
 Wash dal thoroughly. Add 2 cups of water and pressure cook (I usually d0n’t go beyond 2 whistles so that it’s cooked but still has the moisture and is easy to mash)


 While the dal cools down, chop up the onions and tomatoes, crush the garlic pods and slit a green chilli and keep aside


Once cooled, mash the dal

Now heat 2 tbsp of oil in a kadai or a saucepan. Add the ingredients for tempering

When the seeds start popping, add the chopped onion and green chilli

Fry the onions on low flame for about 2 mins

As the onions get ready, wash and chop the coriander leaves fine for the garnish (Chop the stalks fine and add it to the tomato.. this should enhance the flavour)

Into the kadhai goes the chopped tomato and cook till they are soft. Add the garlic, salt and a tsp of chilli powder and fry for a minute. (Hmmm…savour the lovely aroma of garlic)

Pour in the mashed dal and bring to a boil. Simmer for about 5 minutes. (Add water in the right proportion but make sure it’s not watery )

Garnish it with chopped fresh coriander leaves


Serve hot with phulkas, chapathis or steamed white rice

Write in and tell me how this simple dish made fingers lick...


Yours Tastefully!!

Sending this recipe to Kiran's "Cooking with Whole foods" hosted by "Veggie Platter"